2020-03-20Azure,Monitor,PowerShell/Azure CLI
Azure Monitorのアクショングループの作成およびテスト通知の手順です。
メール通知のアクションを例として手順を確認しています。
アクショングループが実行されたかどうかを確認する方法も紹介しています。
Azure Portal、Azure PowerShell、REST API、Azure CLI、それぞれの手順を確認しています。
※Azure PowerShell(Azモジュール)は11.2.0を利用しています。
※Azure CLIは2.54.0を利用しています。
※Azure REST APIはブラウザから実行しています。実行時のAPI Versionは2021-09-01です。
アクショングループの作成手順
作成したアクショングループの設定値
作成したアクショングループに設定した値です。
作成方法ごとに、設定値の末尾に数値を付加しています。
-
- 末尾の数値
- Azure Portal:01
- Azure PowerShell:02
- REST API:03
- Azure CLI:04
| タブ名 |
項目名 |
設定値 |
| 基本 |
リージョン |
グローバル |
| アクショングループ名 |
actiongroup-xx |
| 表示名 |
ag-xx |
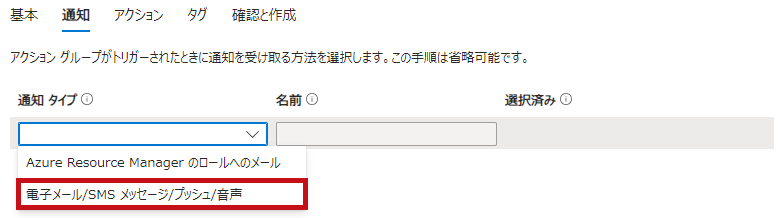
| 通知 |
通知タイプ |
電子メール/SMS メッセージ/プッシュ/音声 |
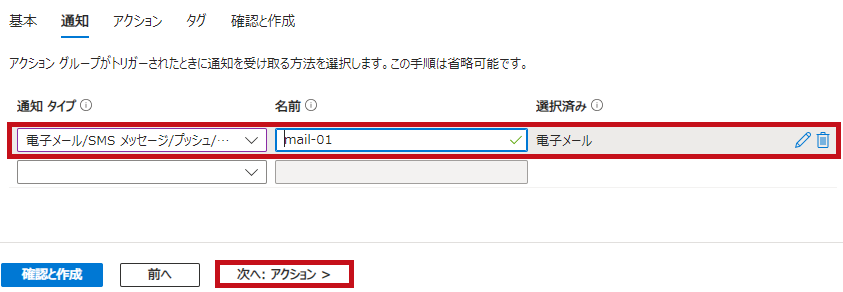
| 名前 |
mail-xx |
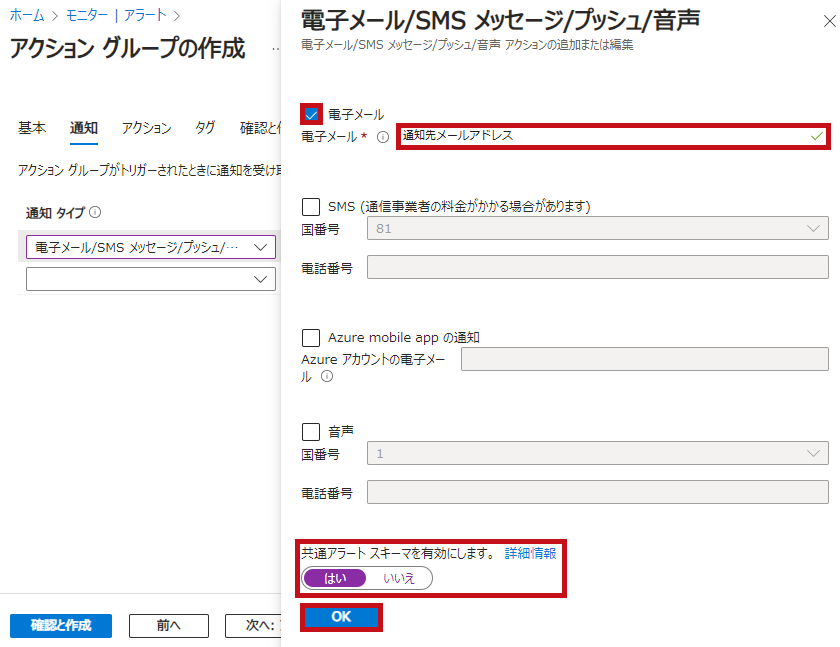
| 電子メール |
チェックあり
通知先メールアドレスを設定 |
| 共通アラートスキーマ |
有効にする |
| アクション |
設定しない |
※特定のリージョンにアクショングループを保存したい場合は、保存先となるリージョンを選択します。
Azure Portalを使用したアクショングループの作成手順
Azure Portalを使用してアクショングループを作成します。
MS Learnを参考に手順を確認しています。
Azure portal でアクション グループを作成する
| アクショングループを作成 |
左側のメニューでアラートを選択します。
作成からアクショングループを選択します。 |
 |
アクショングループ名や表示名を設定します。
今回、リージョンはグローバルを選択しています。 |
 |
|
通知設定です。
アラートを通知する電子メール送信先を設定し、名前を指定します。
※今回は共通アラートスキーマを有効にしています。
|
 |
 |
 |
|
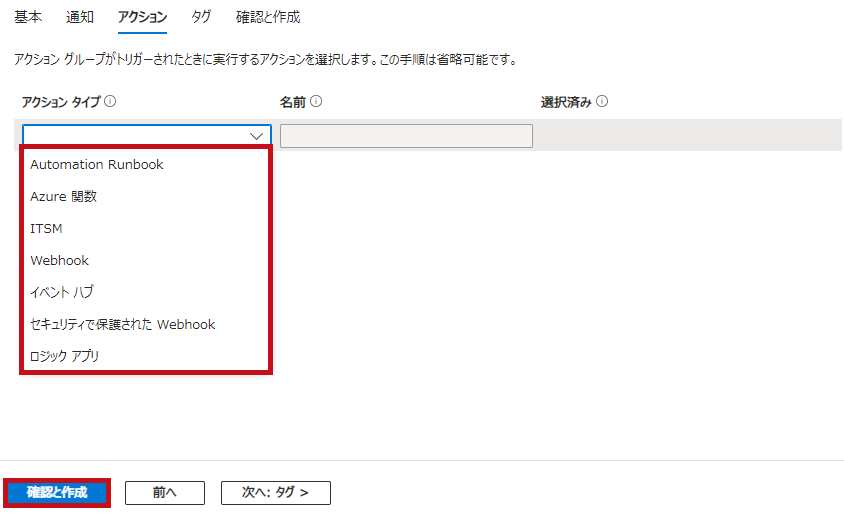
アクション設定画面です。
今回は設定せずに次に進みます。
※アクションとして、Azure FunctionsやLogic Appsなども追加できます。
|
 |
|
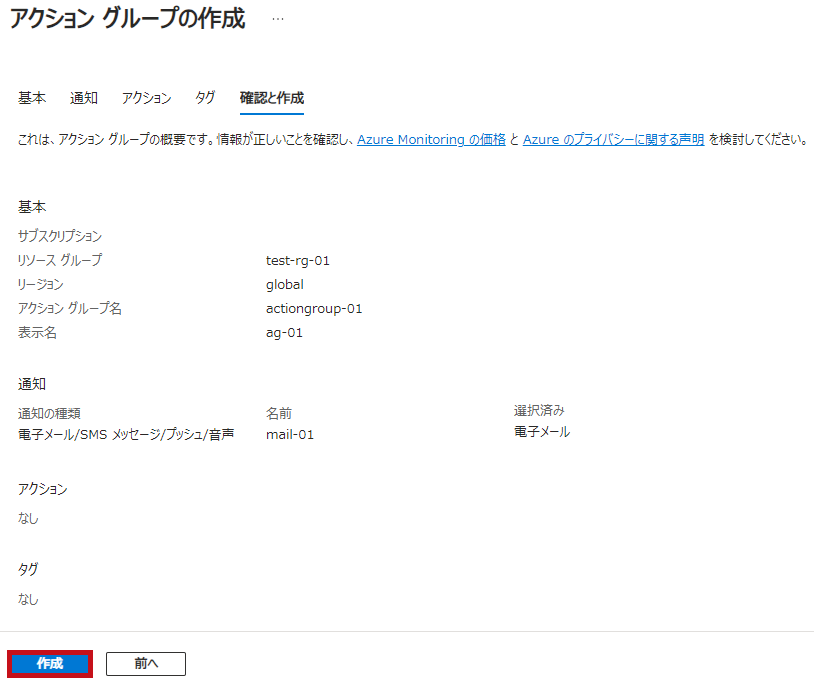
確認画面です。
設定値を確認します。
作成を選択します。
|
 |
作成したアクショングループを確認
作成したアクショングループを確認します。
| アクショングループを確認 |
左側のメニューでアラートを選択します。
アクショングループを選択します。 |
 |
アクショングループのリストが表示されます。
作成したアクショングループを確認できます。 |
 |
| アクショングループを選択すると、通知設定を確認できます。 |
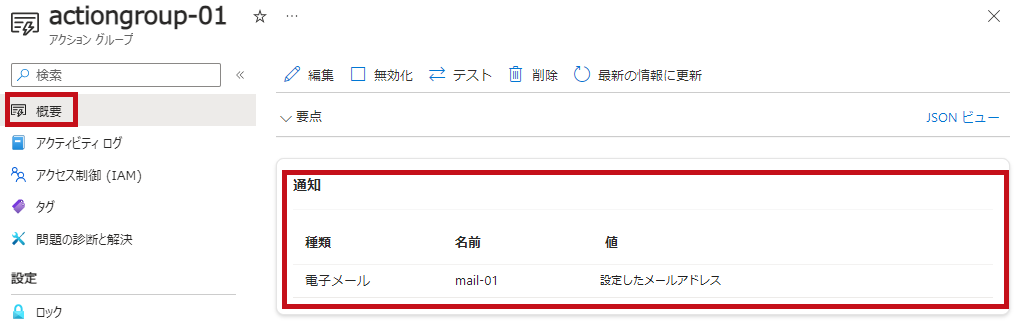 |
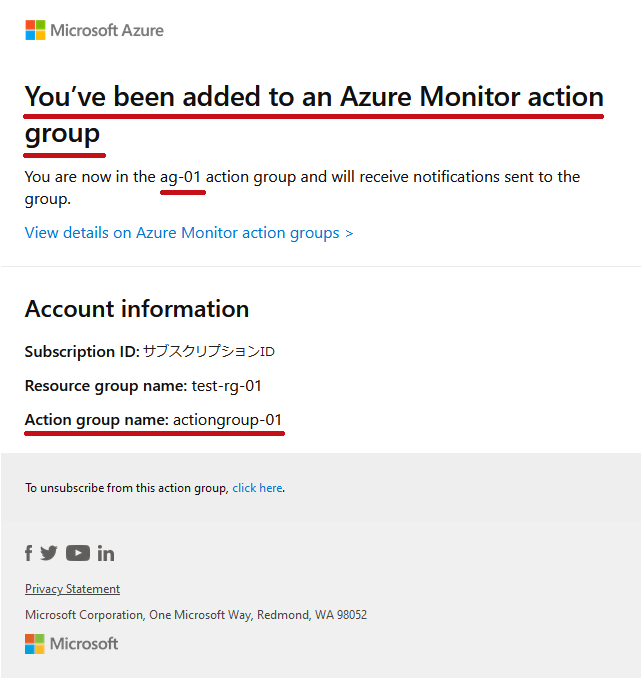
アクショングループ作成時には通知先にメールが届く
アクショングループを作成した場合、通知先には確認メールが届きます。
| 通知メールを確認 |
アクショングループ作成時には、通知先メールアドレスに確認メッセージが送信されます。
アクショングループの名前や表示名を確認できます。 |
 |
Azure PowerShellを使用したアクショングループの作成手順
Azure PowerShellを使用してアクショングループを作成します。
New-AzActionGroupEmailReceiverObjectを使用してメール通知の設定を作成し、その設定を変数に格納します。
次に、格納した変数を使用してアクショングループを作成します。
アクショングループの作成にはNew-AzActionGroupを利用します。
通知方法に応じたコマンドレットが用意されています。
SMS通知の場合はNew-AzActionGroupSmsReceiverObjectを使用します。
| アクショングループを作成 |
|
New-AzActionGroupEmailReceiverObjectを使用してメール通知の設定を作成します。
New-AzActionGroupを使用してアクショングループを作成します。
New-AzActionGroupの実行時にEnabledオプションを追加します。
Enabledオプションが指定されていない場合、アクショングループは無効になります。
|
$resourcegroupname = “test-rg-01" #リソースグループ名
$location = “Global" #リージョン
$actiongroupname = “actiongroup-02" #アクショングループ名
$actiongroupshortname = “ag-02" #表示名
$emailreceivername = “mail-02" #通知名
$emailaddress = “通知先メールアドレス" #通知先メールアドレス
$usecommonalertschema = 1 #共通アラートスキーマ(1で有効化)
#メール通知を作成(メール通知設定値を変数 $emailobject01に格納)
$emailobject01 = New-AzActionGroupEmailReceiverObject `
-EmailAddress $emailaddress `
-Name $emailreceivername `
-UseCommonAlertSchema $usecommonalertschema
#アクショングループを作成
New-AzActionGroup -Name $actiongroupname `
-GroupShortName $actiongroupshortname `
-ResourceGroupName $resourcegroupname `
-Location $location `
-EmailReceiver $emailobject01 `
-Enabled
|
|
|
Get-AzActionGroupで作成したアクショングループを確認します。
アクショングループの一覧を確認できます。
※Azure Portalでもアクショングループが有効化されていることを確認できます。
|
|
PS C:\>
$resourcegroupname = “test-rg-01"
PS C:\>
Get-AzActionGroup -ResourceGroupName $resourcegroupname
Location Name ResourceGroupName
——– —- —————–
Global actiongroup-02 test-rg-01
Global actiongroup-01 test-rg-01
|
|
|
|
|
Get-AzActionGroupを使用してリソースを指定すると、作成したアクショングループの詳細を確認できます。
EmailReceiverの項目では、メール通知の設定内容が表示されます。
Enabledの値がTrueの場合、アクショングループは有効な状態です。
|
PS C:\> $resourcegroupname = “test-rg-01"
PS C:\> $actiongroupname = “actiongroup-02"
PS C:\> Get-AzActionGroup -ResourceGroupName $resourcegroupname -name $actiongroupname
ArmRoleReceiver : {}
AutomationRunbookReceiver : {}
AzureAppPushReceiver : {}
AzureFunctionReceiver : {}
EmailReceiver : {{
“name": “mail-02",
“emailAddress": “通知先メールアドレス",
“useCommonAlertSchema": true,
“status": “Enabled"
}}
Enabled : True
EventHubReceiver : {}
GroupShortName : ag-02
Id : /subscriptions/サブスクリプションID/resourceGroups/test-rg-01/providers/microsoft.insights/actionGroups/actiongroup-02
ItsmReceiver : {}
Location : Global
LogicAppReceiver : {}
Name : actiongroup-02
ResourceGroupName : test-rg-01
SmsReceiver : {}
Tag : {
}
Type : Microsoft.Insights/ActionGroups
VoiceReceiver : {}
WebhookReceiver : {}
|
|
Azure Portalでアクショングループの設定を確認します。
同様にメール通知の設定内容を確認できます。 |

|
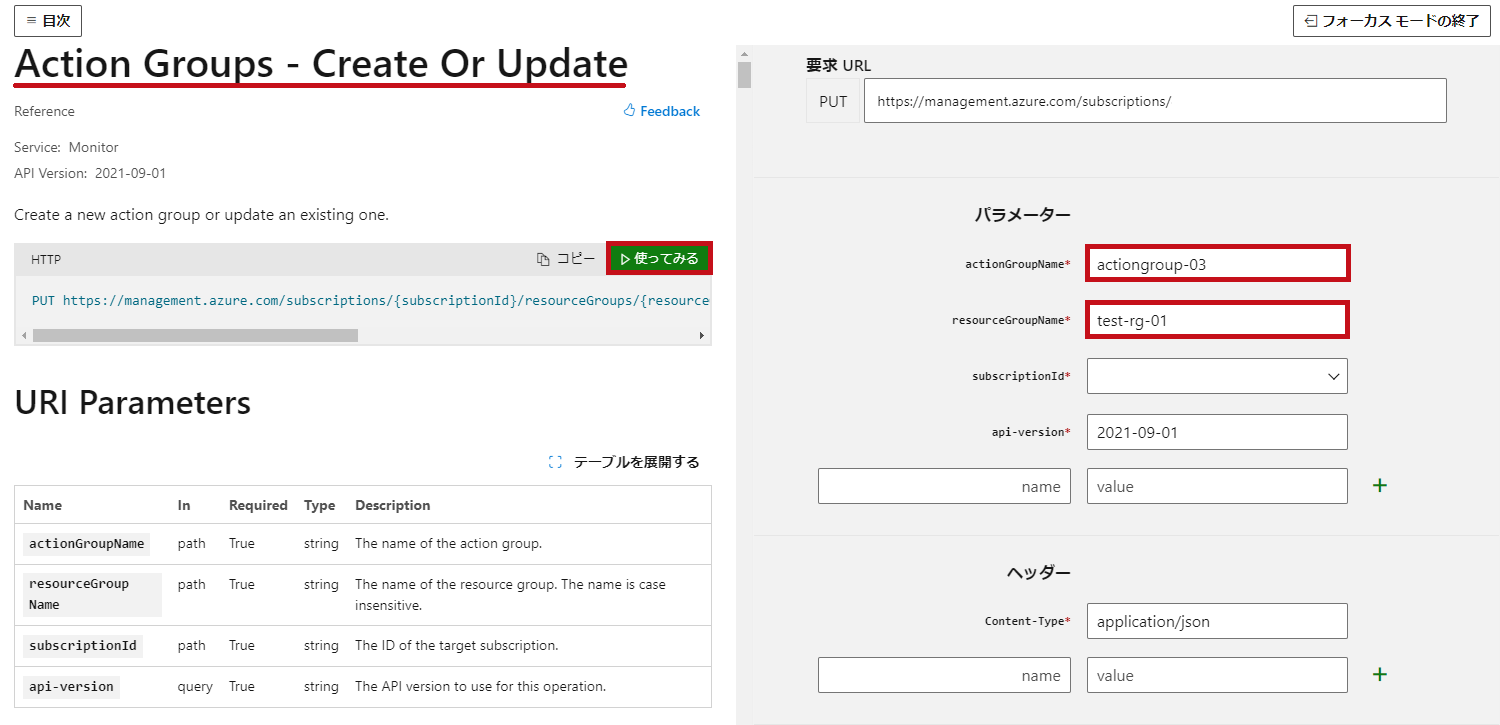
Azure REST APIを使用したアクショングループの作成手順
Azure REST APIを使用してアクショングループを作成します。
今回はブラウザから実行しています。MS Learnの"REST APIを使ってみる"機能を利用しています。
ブラウザやPostmanを使ったAzure REST APIの操作手順については、こちらで紹介しています。
| アクショングループを作成 |
|
MS LearnのWebページでパラメーターおよび本文を設定し、実行します。
【要求URL例(PUT)】
https://management.azure.com/subscriptions/サブスクリプションID/resourceGroups/test-rg-01/providers/Microsoft.Insights/actionGroups/actiongroup-03?api-version=2021-09-01
|
|
【本文例】
|
{
“location": “Global",
“tags": {},
“properties": {
“groupShortName": “ag-03",
“enabled": true,
“emailReceivers": [
{
“name": “mail-03",
“emailAddress": “通知先メールアドレス",
“useCommonAlertSchema": true
}
]
}
}
|
|
|
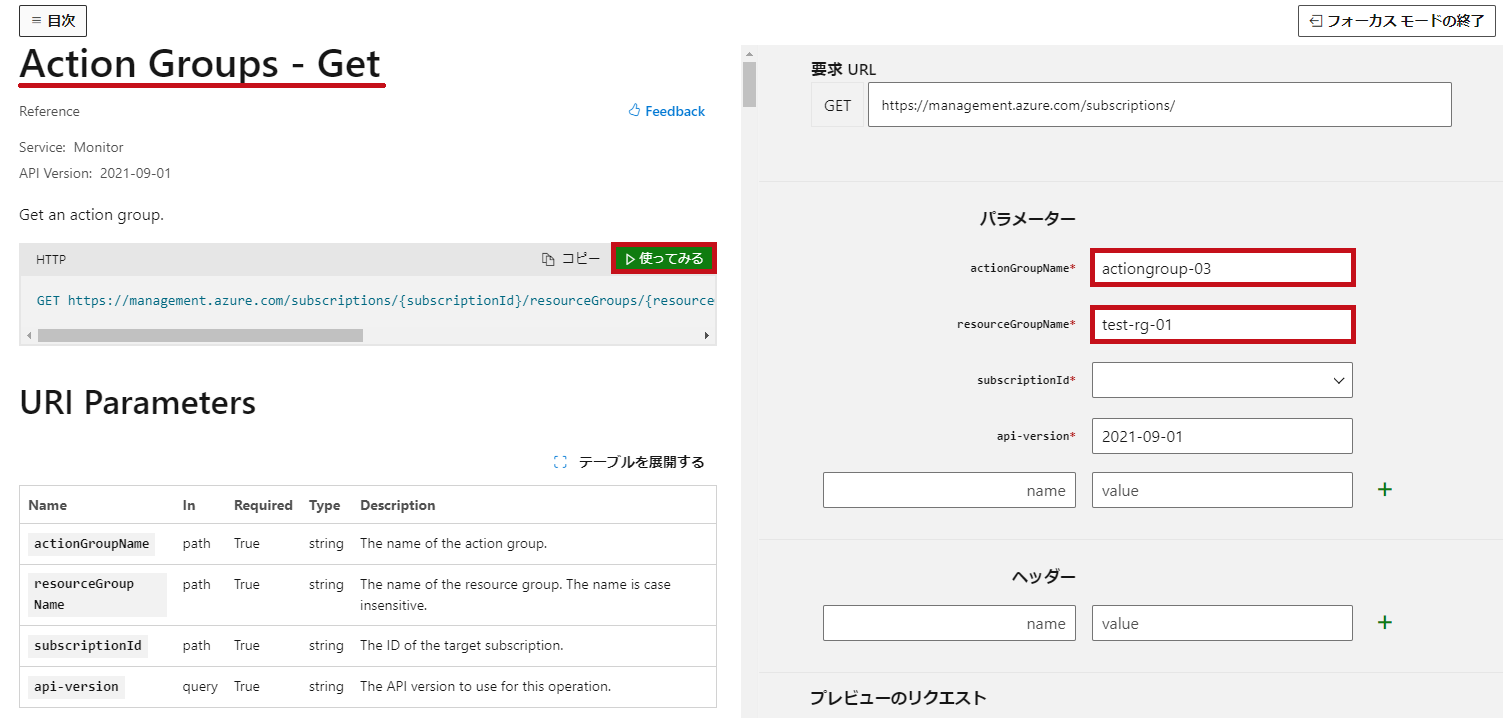
作成したアクショングループを確認します。
【要求URL例(GET)】
https://management.azure.com/subscriptions/サブスクリプションID/resourceGroups/test-rg-01/providers/Microsoft.Insights/actionGroups/actiongroup-03?api-version=2021-09-01
|
|
REST APIの応答を確認します。
アクショングループの設定内容が表示されます。
emailReceivers項目で、メール通知の設定内容を確認できます。
|
{
“id": “/subscriptions/サブスクリプションID/resourceGroups/test-rg-01/providers/microsoft.insights/actionGroups/actiongroup-03",
“type": “Microsoft.Insights/ActionGroups",
“name": “actiongroup-03",
“location": “Global",
“kind": null,
“tags": null,
“properties": {
“groupShortName": “ag-03",
“enabled": true,
“emailReceivers": [
{
“name": “mail-03",
“emailAddress": “通知先メールアドレス",
“useCommonAlertSchema": true,
“status": “Enabled"
}
],
“smsReceivers": [],
“webhookReceivers": [],
“eventHubReceivers": [],
“itsmReceivers": [],
“azureAppPushReceivers": [],
“automationRunbookReceivers": [],
“voiceReceivers": [],
“logicAppReceivers": [],
“azureFunctionReceivers": [],
“armRoleReceivers": []
}
}
|
|
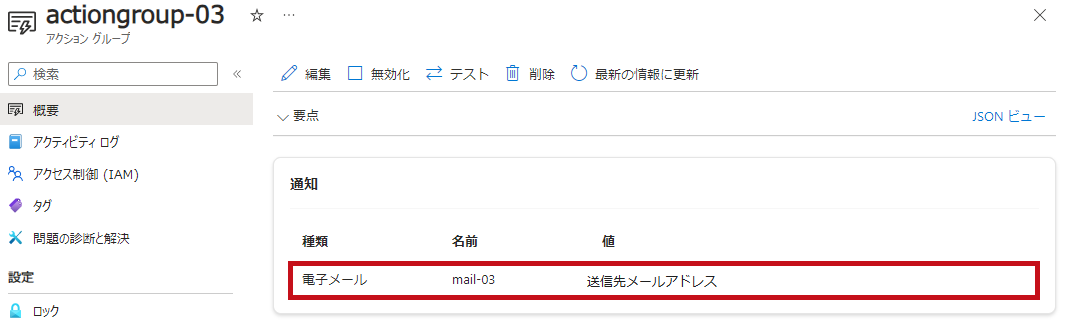
Azure Portalでアクショングループの設定を確認します。
REST APIで作成したアクショングループも確認できます。 |

|
|
|
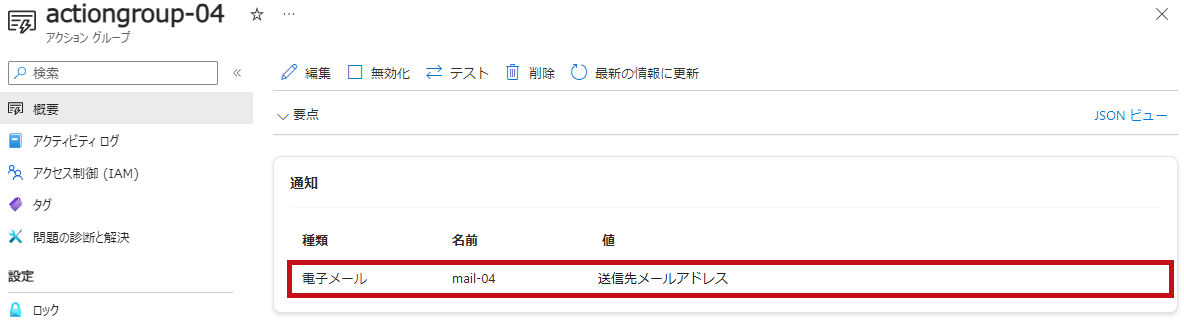
Azure CLIを使用したアクショングループの作成手順
Azure CLIを使用してアクショングループを作成します。
az monitor action-group createコマンドでアクショングループを作成します。
作成したアクショングループの確認には、az monitor action-group listやaz monitor action-group showコマンドを使用します。
| アクショングループを作成 |
|
az monitor action-group createコマンドを使用してアクショングループを作成します。
メール通知設定は–actionオプションで指定します。
–actionオプション内でusecommonalertschemaを指定することで、共通アラートスキーマを有効化できます。
|
$resourcegroupname = “test-rg-01" #リソースグループ名
$location = “Global" #リージョン名
$actiongroupname = “actiongroup-04" #アクショングループ名
$actiongroupshortname = “ag-04" #表示名
$emailreceivername = “mail-04" #通知名
$emailaddress = “通知先メールアドレス" #通知先メールアドレス
az monitor action-group create `
–action-group-name $actiongroupname `
–resource-group $resourcegroupname `
–action email $emailreceivername $emailaddress usecommonalertschema `
–group-short-name $actiongroupshortname `
–location $location
|
|
|
az monitor action-group listコマンドを使用してアクショングループの一覧を表示します。
|
PS C:\>
az monitor action-group list –output table
Name ResourceGroup GroupShortName Enabled Location Email Sms Webhook Armrole Azureapppush Itsm Automationrunbook Voice Logicapp Azurefunction Eventhub
————– ————— —————- ——— ———- ——-
actiongroup-02 test-rg-01 ag-02 True Global 1 0 0 0 0 0 0 0 0 0 0
actiongroup-03 test-rg-01 ag-03 True Global 1 0 0 0 0 0 0 0 0 0 0
actiongroup-04 test-rg-01 ag-04 True Global 1 0 0 0 0 0 0 0 0 0 0
actiongroup-01 test-rg-01 ag-01 True Global 1 0 0 0 0 0 0 0 0 0 0
|
|
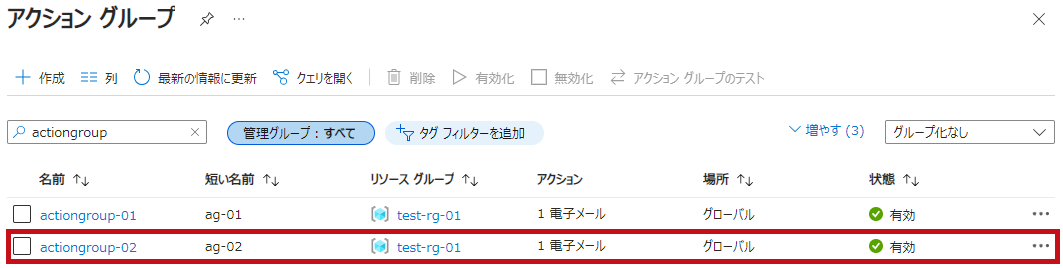
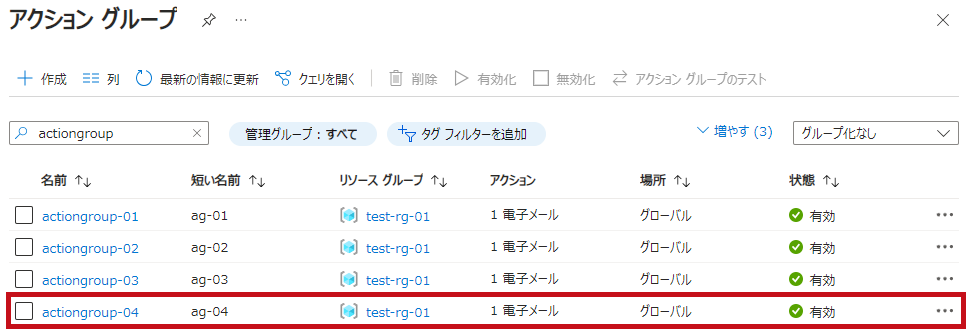
Azure Portalで確認します。
作成したアクショングループを確認できます。 |
|
|
PS C:\> az monitor action-group show –name actiongroup-04 –resource-group test-rg-01
{
“armRoleReceivers": [],
“automationRunbookReceivers": [],
“azureAppPushReceivers": [],
“azureFunctionReceivers": [],
“emailReceivers": [
{
“emailAddress": “通知先メールアドレス,
“name": “mail-04",
“status": “Enabled",
“useCommonAlertSchema": true
}
],
“enabled": true,
“eventHubReceivers": [],
“groupShortName": “ag-04",
“id": “/subscriptions/サブスクリプションID/resourceGroups/test-rg-01/providers/microsoft.insights/actionGroups/actiongroup-04",
“itsmReceivers": [],
“location": “Global",
“logicAppReceivers": [],
“name": “actiongroup-04",
“resourceGroup": “test-rg-01",
“smsReceivers": [],
“type": “Microsoft.Insights/ActionGroups",
“voiceReceivers": [],
“webhookReceivers": []
}
|
|
Azure Portalでアクショングループの設定を確認します。
Azure CLIで作成したアクショングループも確認できます。 |
|
—広告—
アクショングループのテスト通知手順
作成したアクショングループはテスト通知を実行して、通知が正しく届くことを確認できます。
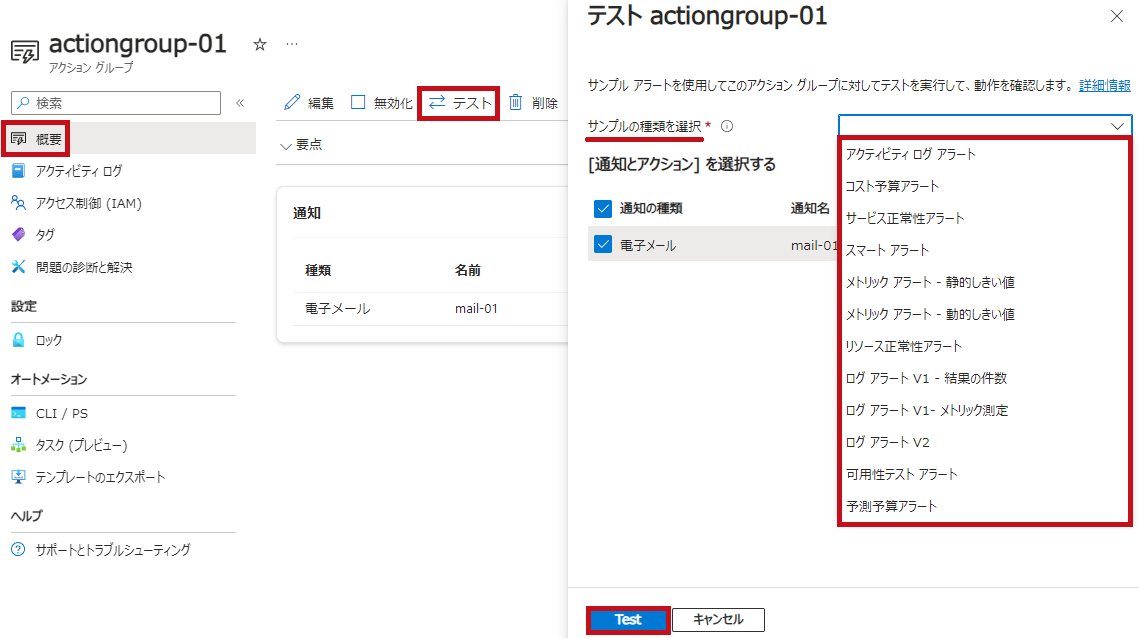
Azure Portalを使用したアクショングループのテスト通知手順
Azure Portalを使用してテスト通知を実行します。
MS Learnを参考に手順を確認しています。
Azureポータルでアクショングループをテストする
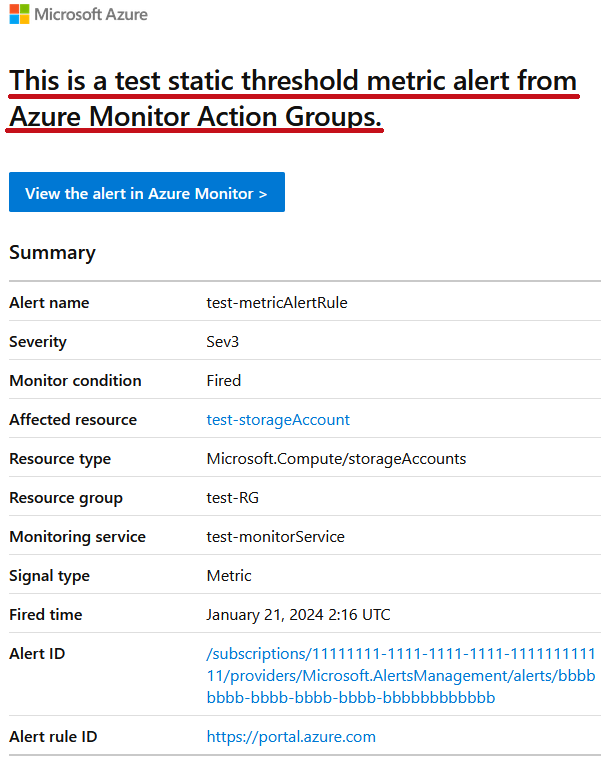
サンプルの種類にはメトリックアラートの静的しきい値を使用しています。
| アクショングループのテスト通知手順 |
アクショングループの画面で概要にあるテストを選択します。
サンプルの種類と通知先にチェックを入れます。
Testを選択します。 |
 |
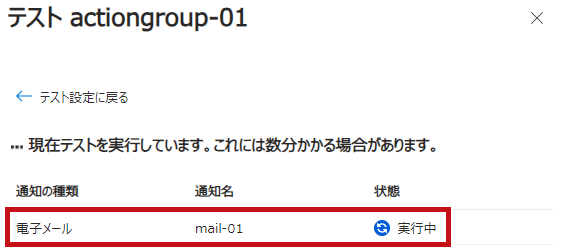
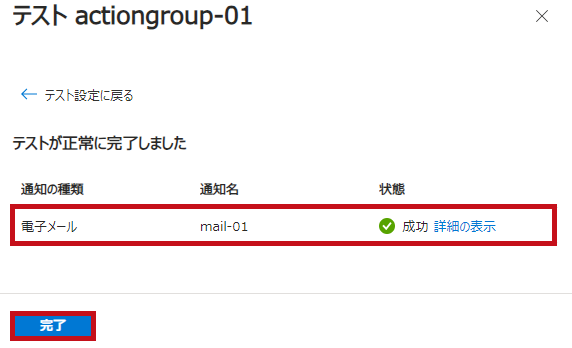
テストの実行画面が表示されます。
しばらくすると完了メッセージが表示されます。 |
 |
 |
| 通知先のメールアドレスにテストメールが届きます。 |
 |
Azure PowerShellを使用したアクショングループのテスト通知手順
Azure PowerShellを使用してテスト通知を実行します。
サンプルの種類にはメトリックアラートの静的しきい値を使用しています。
テストの実行にはTest-AzActionGroupコマンドレットを使用します。
Get-AzActionGroupで取得した値を使用します。
| アクショングループのテスト通知手順 |
|
Get-AzActionGroupを使用してアクショングループの情報を取得します。
Test-AzActionGroupでテストを実行します。
Test-AzActionGroupのパラメーターにはGet-AzActionGroupで取得したアクショングループの設定内容を使用します。
AlertTypeパラメーターには適切な値を設定します。
AlertType
メトリックアラートの静的しきい値の場合、AlertTypeにmetricstaticthresholdを指定します。
|
$resourcegroupname = “test-rg-01" #リソースグループ名
$actiongroupname = “actiongroup-02" #アクショングループ名
$actiongroup = Get-AzActionGroup -ResourceGroupName $resourcegroupname -name $actiongroupname
Test-AzActionGroup -ResourceGroupName $resourcegroupname `
-ActionGroupName $actiongroupname `
-AlertType metricstaticthreshold `
-Receiver $actiongroup.EmailReceiver
|
|
|
実行結果です。
Statusを確認するとSucceededとなっており、テストが成功していることが分かります。
Azure Portalを使用したテスト実行時と同様に、通知先のメールアドレスでテストメールの受信を確認できます。
|
EmailReceiver
ActionDetail : {{
“MechanismType": “Email",
“Name": “mail-02",
“Status": “Succeeded",
“SendTime": “2024-01-21T06:35:46.708231+00:00"
}}
CompletedTime : 2024-01-21T06:37:29.5070993+00:00
ContextNotificationSource : Microsoft.Insights/TestNotification
ContextType :
CreatedTime : 2024-01-21T06:35:46.3977426+00:00
State : Complete
|
|
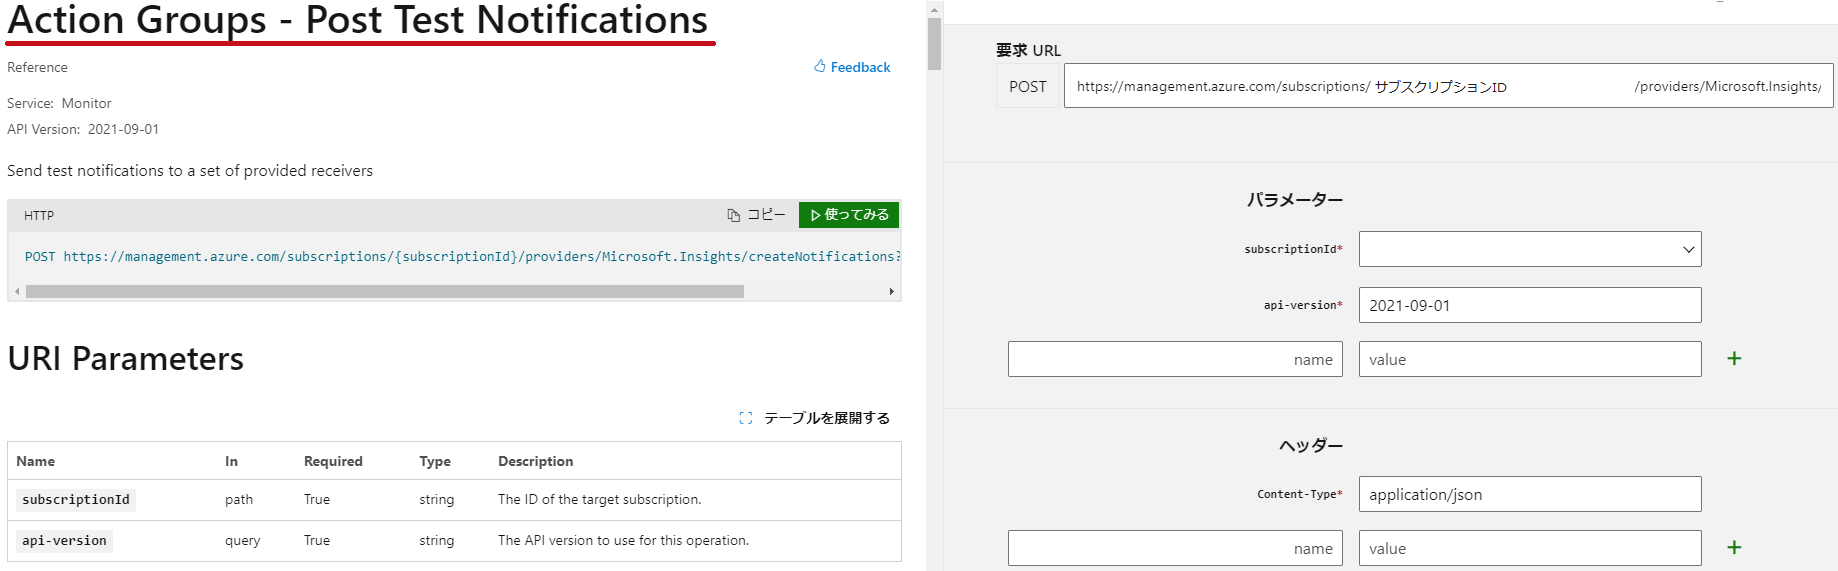
Azure REST APIを使用したアクショングループのテスト通知手順
Azure REST APIを使用してテストを実行します。
通知先には、Azure Portalでテストを実行した場合と同様に、テストメールが送信されます。
ブラウザやPostmanを使ったAzure REST APIの操作手順については、こちらで紹介しています。
| アクショングループのテスト通知手順 |
|
MS LearnのWebページでパラメーターおよび本文の設定を行い、実行します。
【要求URL例(POST)】
https://management.azure.com/subscriptions/サブスクリプションID/providers/Microsoft.Insights/createNotifications?api-version=2021-09-01
|
|
【本文例】
|
{
“alertType": “metricstaticthreshold",
“emailReceivers": [
{
“name": “mail-03",
“emailAddress": “通知先メールアドレス",
“useCommonAlertSchema": true
}
]
}
|
|
Azure CLIを使用したアクショングループのテスト通知手順
Azure CLIを使用してテスト通知を実行します。
サンプルの種類にはメトリックアラートの静的しきい値を使用しています。
テストの実行にはaz monitor action-group test-notificationsコマンドを使用します。
| アクショングループのテスト通知手順 |
|
az monitor action-group test-notifications createを使用してテストを実行します。
メール通知は-a(–add-action)オプションで設定します。
-a(–add-action)オプション内でusecommonalertschemaを指定することで、共通アラートスキーマを有効化できます。
|
$resourcegroupname = “test-rg-01" #リソースグループ名
$location = “Global" #リージョン
$actiongroupname = “actiongroup-04" #アクショングループ名
$emailreceivername = “mail-04" #通知名
$emailaddress = “通知先メールアドレス" #通知先メールアドレス
az monitor action-group test-notifications create `
–action-group-name $actiongroupname `
–resource-group $resourcegroupname `
-a email $emailreceivername $emailaddress usecommonalertschema `
–alert-type metricstaticthreshold
|
|
|
実行結果です。
Statusを確認するとSucceededとなっており、テストが成功していることが分かります。
Azure Portalを使用したテスト実行時と同様に、通知先のメールアドレスでテストメールの受信を確認できます。
|
{
“actionDetails": [
{
“MechanismType": “Email",
“Name": “mail-04",
“SendTime": “2024-01-21T12:41:18.6092267+00:00",
“Status": “Succeeded"
}
],
“completedTime": “2024-01-21T12:43:12.0184741+00:00",
“context": {
“notificationSource": “Microsoft.Insights/TestNotification"
},
“createdTime": “2024-01-21T12:41:18.3839798+00:00",
“state": “Complete"
}
|
|
—広告—
アクショングループが実行されたかどうかを確認する方法
アラートが発生した際に、アクショングループが実行されたかどうかを確認する方法です。
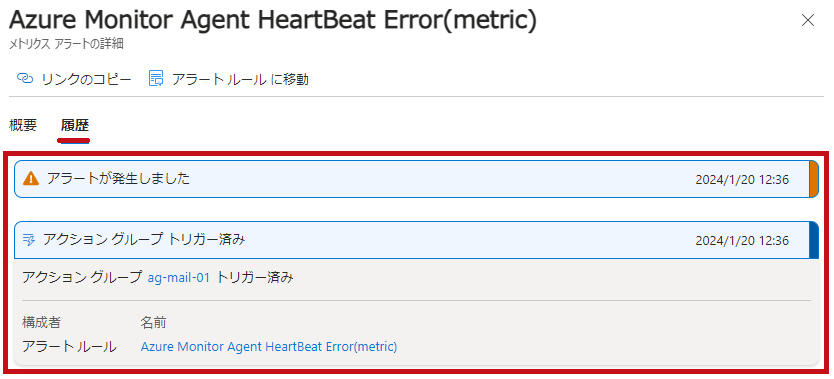
アラートの詳細画面の履歴タブで確認できる
発生したアラートの詳細画面の履歴タブで確認できます。
| アラートの詳細画面の履歴タブで確認 |
アラートの詳細画面の履歴タブを選択します。
トリガーされたアクショングループを確認できます。 |
 |
アラート通知メールでアクショングループ名を確認
アラート通知メールの本文でも、どのアクショングループから送信されたメールかを確認できます。
| アラート通知メールでアクショングループ名を確認 |
| アラート通知メールの一番下を確認すると、アクショングループの表示名が記載されています。 |
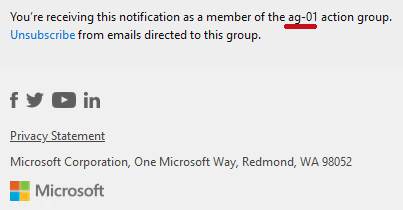 |
※アクショングループのテスト実行時には表示されないようです。
アクショングループの有効・無効化手順
アクショングループの有効化および無効化の手順については、こちらで紹介しています。
最後に
Azure Portal、Azure PowerShell、Azure CLI、REST APIを使用した、アクショングループの作成からテストまでの手順を確認しました。
また、実行されたアクショングループの確認方法についても記載しています。
アクショングループのテストは、通知が行われない場合の原因確認などにも活用できます。
引き続き、いろいろ試してみたいと思います。
アラート処理ルールを利用した非監視設定の手順については、こちらで紹介しています。