2021-05-29 Azure , Others , Terraform , Virtual Machines
Terraformは、HashiCorp社が提供するコードを利用してクラウドなどのリソースをデプロイするためのIaC(Infrastructure as Code)ツールです。
前回 は、初めてのTerraformというテーマで、インストールからAzureのリソースグループの作成・削除までの一連の流れを確認しました。
なお、今回の設定作業については、こちらのサイトを参考に実施しています。
Terraform を使用して Azure に Linux VM とインフラストラクチャを作成する
※本記事では、Azure Virtual Machines(Azure VM)を仮想マシンとして表記しています。
作成する仮想マシンの構成やTerraformのファイル 仮想マシンの主な構成 今回作成する仮想マシンの構成です。
区分
項目
設定値
リソースグループ
リソースグループ名
test-rg
場所
米国東部2(eastus2)
仮想ネットワーク
仮想ネットワーク名
vnet-01
アドレス空間
サブネット
サブネット名
subnet-01
サブネットアドレス空間
パブリックIP
パブリックIP名
pubip-01
ネットワークインターフェース
ネットワークインターフェース名
仮想マシン
仮想マシン名
OS
仮想マシンサイズ
Standard_B1ms
管理者ユーザー名
管理者パスワード
ディスク名
test-vm-01_OsDisk
作成したTerraformのファイル 作成したTerraformのファイルは、以下の表の通りです。
※ファイル名は任意ですが拡張子が.tfである必要があります。
Terraformでリソースをデプロイする際に利用したコマンド 今回使用したコマンドは、terraform applyとterraform destroyです。
利用したTerraformコマンド
terraform apply
resourceで定義されたリソースをデプロイします。
terraform destroy
指定したリソースを削除します。
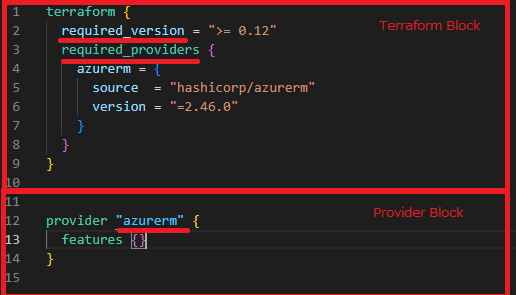
仮想マシンデプロイ用ファイル(.tfファイル) main.tfの内容 main.tfで、TerraformがAzureリソースを操作するための設定をします。
main.tf
terraform Blockでrequired_versionとrequired_providersを指定します。
terraform {
required_version = “>= 0.12"
required_providers {
azurerm = {
source = “hashicorp/azurerm"
version = “=2.46.0"
}
}
}
provider “azurerm" {
features {}
}
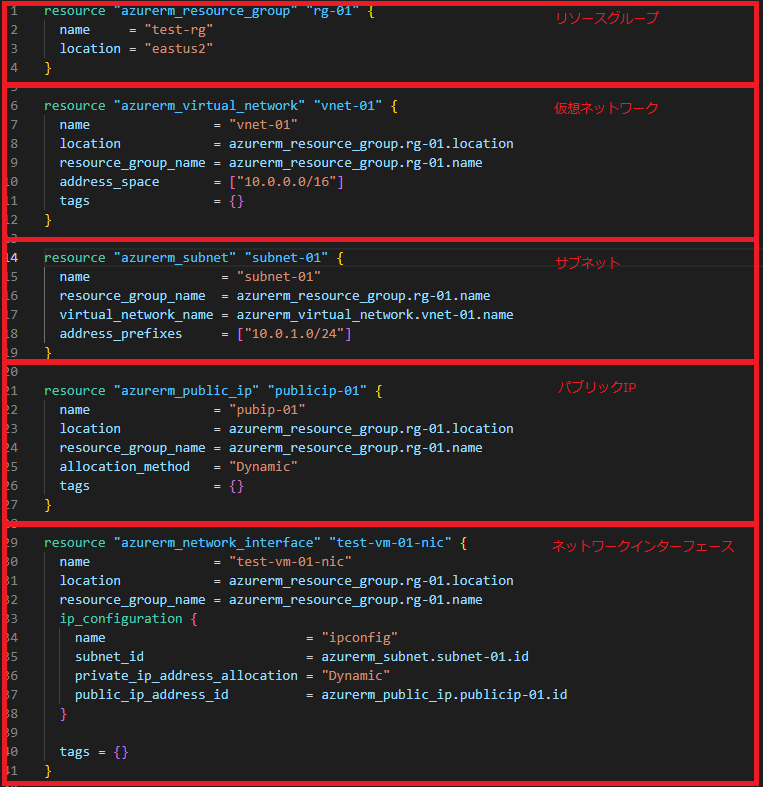
vm.tfの内容 vm.tfでは、Terraformを使用して仮想マシンリソースをデプロイするための定義を行っています。
リソースブロックの順番はどのような順番でも問題ありません。
設定ファイル
リソースグループ、仮想ネットワーク、サブネット、パブリックIP、ネットワークインターフェースと言った仮想マシンの関連リソースを定義します。
各リソースをデプロイするリソースグループはazurerm_resource_group.rg-01.nameと記載しています。
サブネットの場合はデプロイ先の仮想ネットワークを virtual_network_name = azurerm_virtual_network.vnet-01.nameと記載しています。vm.tf内で定義している仮想ネットワーク(vnet-01)指定しています。
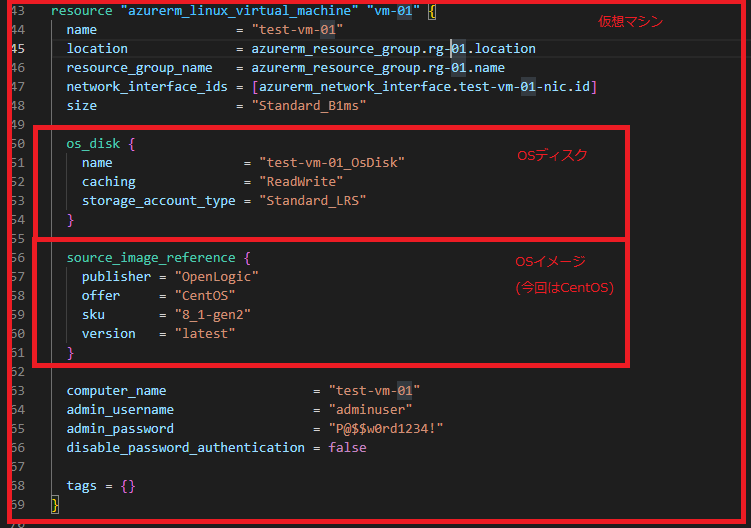
仮想マシンのリソースを定義しています。
※仮想マシンのテンプレートはWindowsとLinuxで異なります。
resource “azurerm_resource_group" “rg-01" {
name = “test-rg"
location = “eastus2"
}
resource “azurerm_virtual_network" “vnet-01" {
name = “vnet-01"
location = azurerm_resource_group.rg-01.location
resource_group_name = azurerm_resource_group.rg-01.name
address_space = [“10.0.0.0/16"]
tags = {}
}
resource “azurerm_subnet" “subnet-01" {
name = “subnet-01"
resource_group_name = azurerm_resource_group.rg-01.name
virtual_network_name = azurerm_virtual_network.vnet-01.name
address_prefixes = [“10.0.1.0/24"]
}
resource “azurerm_public_ip" “publicip-01" {
name = “pubip-01"
location = azurerm_resource_group.rg-01.location
resource_group_name = azurerm_resource_group.rg-01.name
allocation_method = “Dynamic"
tags = {}
}
resource “azurerm_network_interface" “test-vm-01-nic" {
name = “test-vm-01-nic"
location = azurerm_resource_group.rg-01.location
resource_group_name = azurerm_resource_group.rg-01.name
ip_configuration {
name = “ipconfig"
subnet_id = azurerm_subnet.subnet-01.id
private_ip_address_allocation = “Dynamic"
public_ip_address_id = azurerm_public_ip.publicip-01.id
}
tags = {}
}
resource “azurerm_linux_virtual_machine" “vm-01" {
name = “test-vm-01"
location = azurerm_resource_group.rg-01.location
resource_group_name = azurerm_resource_group.rg-01.name
network_interface_ids = [azurerm_network_interface.test-vm-01-nic.id]
size = “Standard_B1ms"
os_disk {
name = “test-vm-01_OsDisk"
caching = “ReadWrite"
storage_account_type = “Standard_LRS"
}
source_image_reference {
publisher = “OpenLogic"
offer = “CentOS"
sku = “8_1-gen2"
version = “latest"
}
computer_name = “test-vm-01"
admin_username = “adminuser"
admin_password = “P@$$w0rd1234!"
disable_password_authentication = false
tags = {}
}
※Linuxの仮想マシンをパスワード認証でデプロイする場合は、disable_password_authentication = falseの追加が必要になります。
Terraformでの変数利用する方法については、こちらで紹介しています。
Terraformのモジュール化については、こちらで紹介しています。
—広告—
Terraformを使って仮想マシンをデプロイ Terraform applyで仮想マシンをデプロイ terraform apply を使用して仮想マシンをデプロイします。
実行結果(抜粋)
PS C:\terraform>
terraform apply
+ create
Terraform will perform the following actions:
# azurerm_linux_virtual_machine.vm-01 will be created + resource “azurerm_linux_virtual_machine" “vm-01" { + admin_password = (sensitive value) + admin_username = “adminuser" + allow_extension_operations = true + computer_name = “test-vm-01" + disable_password_authentication = false + location = “eastus2" + name = “test-vm-01" + resource_group_name = “test-rg" + size = “Standard_B1ms" + os_disk { + caching = “ReadWrite" + name = “test-vm-01_OsDisk" + storage_account_type = “Standard_LRS" }
+ source_image_reference { + offer = “CentOS" + publisher = “OpenLogic" + sku = “8_1-gen2" + version = “latest" } }
# azurerm_network_interface.test-vm-01-nic will be created + resource “azurerm_network_interface" “test-vm-01-nic" { + location = “eastus2" + name = “test-vm-01-nic" + resource_group_name = “test-rg" + name = “ipconfig" + private_ip_address_allocation = “dynamic" + private_ip_address_version = “IPv4" } }
# azurerm_public_ip.publicip-01 will be created + resource “azurerm_public_ip" “publicip-01" { + allocation_method = “Dynamic" + location = “eastus2" + name = “pubip-01" + resource_group_name = “test-rg" + sku = “Basic" }
# azurerm_resource_group.rg-01 will be created + resource “azurerm_resource_group" “rg-01" { + location = “eastus2" + name = “test-rg" }
# azurerm_subnet.subnet-01 will be created + resource “azurerm_subnet" “subnet-01" { + address_prefixes = [ + “10.0.1.0/24", ] + name = “subnet-01" + resource_group_name = “test-rg" + virtual_network_name = “vnet-01" }
# azurerm_virtual_network.vnet-01 will be created + resource “azurerm_virtual_network" “vnet-01" { + address_space = [ + “10.0.0.0/16", ] + location = “eastus2" + name = “vnet-01" + resource_group_name = “test-rg" }
Plan: 6 to add, 0 to change, 0 to destroy.
Do you want to perform these actions? Terraform will perform the actions described above. Only 'yes’ will be accepted to approve.
Enter a value: yes
Apply complete! Resources: 6 added, 0 changed, 0 destroyed.
+ createの部分に作成されるリソースの情報が表示されています。
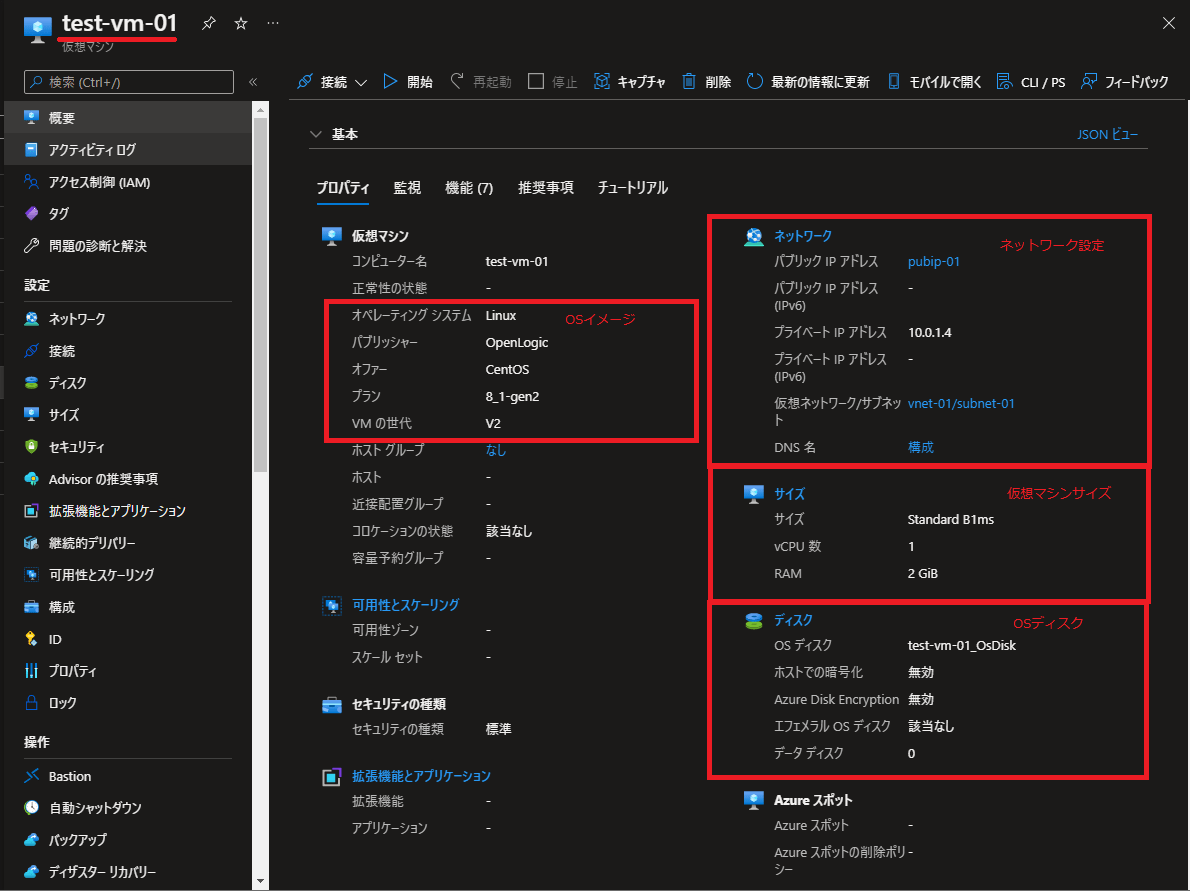
Terraformで作成した仮想マシンのリソースを確認 Terraformを使って作成したリソースを確認します。
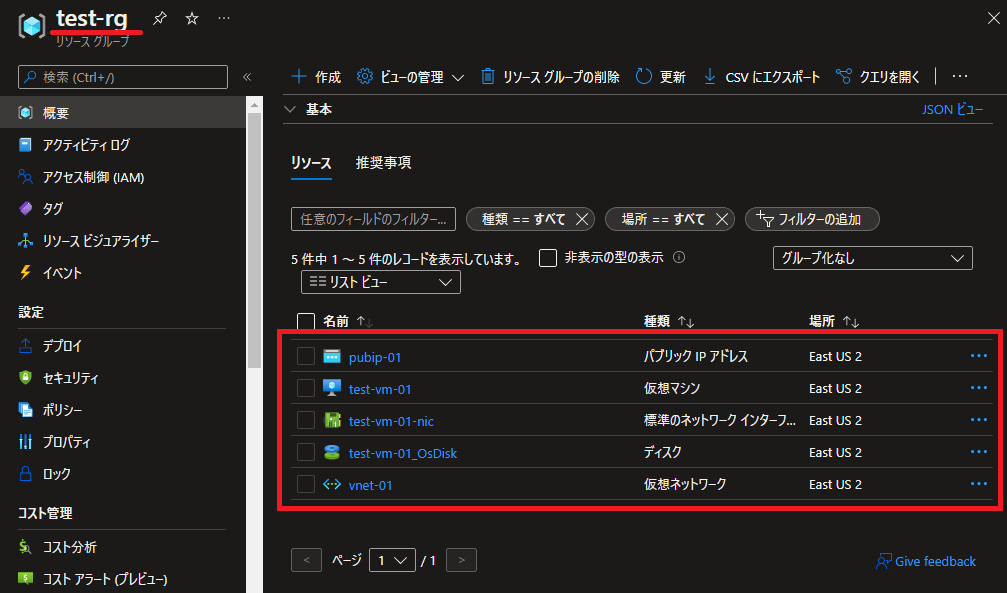
Azure Portalで確認
リソースグループを確認すると、指定したAzureリソースが作成されていることが確認できます。
指定した通り仮想マシンが作成されていることが確認できます。
—広告—
Terraformを使って仮想マシンにNSGの設定を追加 作成した仮想マシンにはNSGが設定されていません。
NSGを仮想マシンに割り当てるために必要なリソースブロックは2つ 追加するリソースブロックは2つです。
NSGをサブネットに割り当てる場合は、azurerm_subnet_network_security_group_associationを使います。
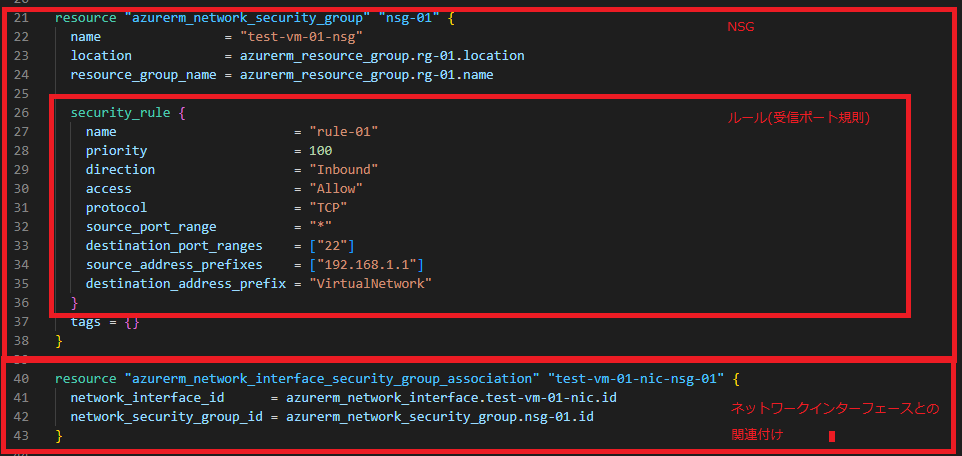
NSG割り当て後のvm.tfの内容 vm.tf を編集し、ネットワークインターフェースにNSGを割り当てます。
vm.tf(NSG追加部分のみ抜粋)
azurerm_network_security_groupでNSGを規定します。security_ruleが規則の設定になります。
azurerm_network_interface_security_group_associationでネットワークインターフェースにNSGを割り当てます。
resource “azurerm_network_security_group" “nsg-01" {
name = “test-vm-01-nsg"
location = azurerm_resource_group.rg-01.location
resource_group_name = azurerm_resource_group.rg-01.name
security_rule {
name = “rule-01"
priority = 100
direction = “Inbound"
access = “Allow"
protocol = “TCP"
source_port_range = “*"
destination_port_ranges = [“22"]
source_address_prefixes = [“192.168.1.1"]
destination_address_prefix = “VirtualNetwork"
}
tags = {}
}
resource “azurerm_network_interface_security_group_association" “test-vm-01-nic-nsg-01" {
network_interface_id = azurerm_network_interface.test-vm-01-nic.id
network_security_group_id = azurerm_network_security_group.nsg-01.id
}
Terraform applyでNSGをネットワークインターフェースに追加 terraform apply を使用してNSGをデプロイします。
処理が完了すると、Apply complete! Resources: 2 added, 0 changed, 0 destroyed.と表示されます。
実行結果(抜粋)
PS C:\terraform> terraform apply
Terraform used the selected providers to generate the following execution plan. Resource actions are indicated with the following symbols: + create
Terraform will perform the following actions:
# azurerm_network_interface_security_group_association.test-vm-01-nic-nsg-01 will be created + resource “azurerm_network_interface_security_group_association" “test-vm-01-nic-nsg-01" { + id = (known after apply) + network_interface_id = “/subscriptions/サブスクリプションID/resourceGroups/test-rg/providers/Microsoft.Network/networkInterfaces/test-vm-01-nic" + network_security_group_id = (known after apply) }
# azurerm_network_security_group.nsg-01 will be created + resource “azurerm_network_security_group" “nsg-01" { + id = (known after apply) + location = “eastus2" + name = “test-vm-01-nsg" + resource_group_name = “test-rg" + security_rule = [ + { + access = “Allow" + description = “" + destination_address_prefix = “VirtualNetwork" + destination_address_prefixes = [] + destination_application_security_group_ids = [] + destination_port_range = “" + destination_port_ranges = [ + “22", ] + direction = “Inbound" + name = “rule-01" + priority = 100 + protocol = “TCP" + source_address_prefix = “" + source_address_prefixes = [ + “192.168.1.1", ] + source_application_security_group_ids = [] + source_port_range = “*" + source_port_ranges = [] }, ] }
Plan: 2 to add, 0 to change, 0 to destroy.
Enter a value: yes
Apply complete! Resources: 2 added, 0 changed, 0 destroyed.
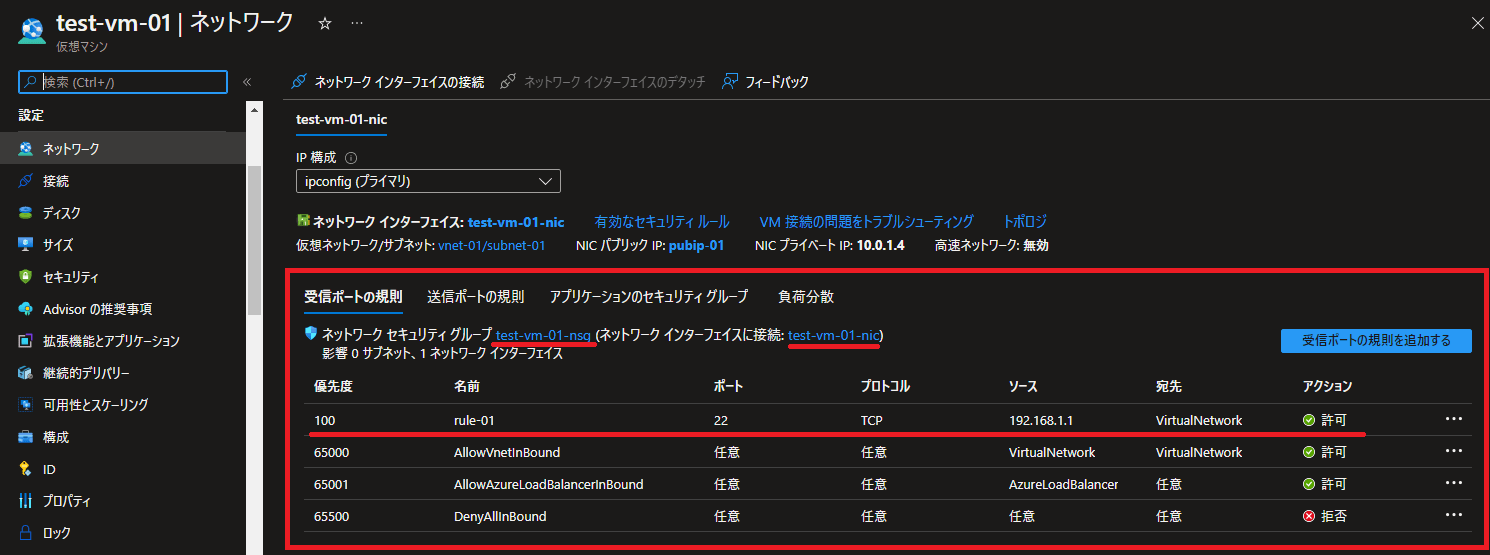
Terraformを使って作成したNSGの設定を確認 Terraformを使って作成した、NSGのリソースを確認します。
Azure Portal
仮想マシンのネットワークを確認すると、NSGが作成されていることが確認できます。
Terraform destroyで作成したリソースを削除 terraform destroy を使用して、作成した仮想マシンを削除します。
実行結果(抜粋)
PS C:\terraform> terraform destroy – destroy
Terraform will perform the following actions:
# azurerm_linux_virtual_machine.vm-01 will be destroyed – resource “azurerm_linux_virtual_machine" “vm-01" { }
# azurerm_network_interface.test-vm-01-nic will be destroyed – resource “azurerm_network_interface" “test-vm-01-nic" { }
# azurerm_public_ip.publicip-01 will be destroyed – resource “azurerm_public_ip" “publicip-01" { }
# azurerm_resource_group.rg-01 will be destroyed – resource “azurerm_resource_group" “rg-01" { }
# azurerm_subnet.subnet-01 will be destroyed – resource “azurerm_subnet" “subnet-01" { }
# azurerm_virtual_network.vnet-01 will be destroyed – resource “azurerm_virtual_network" “vnet-01" { }
Plan: 0 to add, 0 to change, 6 to destroy.
Do you really want to destroy all resources? Terraform will destroy all your managed infrastructure, as shown above. There is no undo. Only 'yes’ will be accepted to confirm.
Enter a value: yes
Destroy complete! Resources: 6 destroyed.
+ createの部分に作成されるリソースの情報が表示されています。
—広告—
最後に Terraformを使った仮想マシンの作成や削除手順を確認してみました。
Azure Provider
Terraformを使ったAzure関連のリソースのデプロイはもちろん、作成したリソースの変更も簡単に行えることが分かりました。
変数の使い方やモジュールの使い方などのTerraformに関する情報を、こちらの記事にまとめています。
Terraformの記事一覧